YOU ARE SIMPLY AMAZING BUTTERFLY

in , , , , , , , by Stacey Marsh Independent UK Stampin' Up! Demonstrator, January 29, 2018
Hi all, 

Hope you all enjoyed a good weekend. Morten birthday parties here for my 5 year old and catching up with family and friends for us.  Nice busy week ahead for us as well but hoping for some crafting time tomorrow evening where I can finally get to play with some of my new products that are sat on my shelf!

This card was a follow on from the series of cards that I made to showcase the Celebrate You Thinlits.  I have had these butterflies from the moment there were available to pre-order for us demonstrators and I used them on everything for ages but I always seem to forget to use them now, silly girl I am sometimes!

This card is alot more detailed than it looks at a glance.  These are the sort of cards that I love to send out as they really have been thoughtfully created.  I'm looking forward to sending this one to someone who I truly think is amazing and such an inspiration!


The card is a mixture of subtle tones including Sahara Sand (for the card base), Crumb Cake (for the stamping and card mat), Copper Foil Card (for the butterfly), White and Black which I really think pulls it all together.  

Again, a few textures going on here too, plain cardstock, Vellum, Foil and Burlap Ribbon.  
I've said it before but I generally think that these Thinlit dies are so effective and the stamp set sets it all off niccely.  


If you would like to order any of these products, or host a Private Workshop in your home to make this card, and 2 others please message me directly. 

These are the products that I have used:

Remember until the end of March everytime you SHOP, HOST or JOIN you can earn extra FREE products.  

Have a great start to the week!

Stacey
xx

CELEBRATE THE GOOD STUFF

in , , , , , , , , by Stacey Marsh Independent UK Stampin' Up! Demonstrator, January 27, 2018
Hi all,

Hooray the weekend is finally here!  For me, the weekend is all about not rushing around here there and everywhere, it's about enjoying family and relaxing, well as much as you can relax with a 5 year old with a busy social life and a 1 year old!

This is the 3rd card that I made to showcase the Celebrate You Thinlits that are currently available for FREE when you spend £90 during Sale-a-Bration.
You have 3 dies within the set, "Amazing", "You" and "Celebrate" and they are a great size for cards, scrapbook pages and paper crafting in general!

This card uses "Celebrate" which I have used along with a sentiment from the Picture Perfect Photopolymer Stamp Set


The card base is made from Lemon Lime Twist Cardstock which looks so effective with the Monochrome look of the DSP (from the Petal Passion range).  This colour is fast becoming one of my favourites.  It is great for adding a real splash of bright colour to a project and it just makes me smile!

I have cut a large scallop (from the Layering Circles Framelits) in Night of Navy Cardstock, and a Whisper White circle from the 2, 1/4" Circle Punch.  I have taken the starburst image from the Amazing You Stamp Set, and stamped it twice onto the circle shape using Lemon Lime Twist InkI love the effect of a sunrise that it gives you.  

I have taken some Watercolour Paper, spritzed with water, added some Prussian Blue Brusho Powder, sprizted with water again and left to dry.  Once dry, I have used the "Celebrate" Thinlit to die-cut the word, and cut an additional one from Basic Black Cardstock which I have mounted behind to give a shadown effect.  This has been stuck onto the circle shape


I have used the Tailored Tag Punch to cut out a piece of Basic Black Cardstock that I have added some Embossing Paste too over a mask from the pattern Party Decorative Masks  and left to dry.  The circle that is stuck to this shape has been cut out using the 1" Circle Punch and some Silver Glimmer Paper.  

I have stamped the sentimed "Celebrate the Good Stuff" onto a piece of Whisper White cardstock using Tuxedo Black Memento and cut out "the good stuff" and attached over the top of the silver circle to finish.    

I really enjoyed making all 3 of these cards and I will definitely be using the Framelits alot!  And it was also great fun having a little play with the Embossing Paste.  The photos don't really do the cards justice but the textures really do set these cards off!

Do you have a favourite of the 3?????  I would love to know your thoughts

Looking forward to some crafting time tomorrow hopefully, and I am so excited to have a play with the Bubble Over suite of products!

Stacey
xx


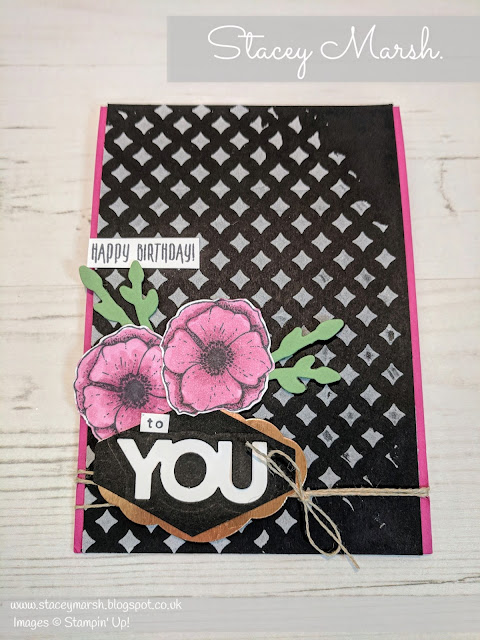
HAPPY BIRTHDAY TO YOU

in , , , , , , , , , by Stacey Marsh Independent UK Stampin' Up! Demonstrator, January 26, 2018
Hi all,

Following on from yesterdays post, this card showcases the Celebrate You Thinlits Dies and the coordinating stamp set Amazing You along with different variations of texture.


For the background, I have used White Embossing Paste on Basic Black Cardstock.  I have added some Linen Thread around the cardstock and mounted onto the card base.  


I have used the flowers from the stamp set, stamped onto Whisper White Cardstock using Tuxedo Black Memento Ink and coloured with the Rich Razzleberry Stampin' Blends.  The leaves have been cut from the Everyday Jars Framelits Dies and attached onto the card base using Stampin' Dimensionals to give depth to the card.  


To create the banner and sentiments I have used Copper Foil Card and the Pretty Label PunchI have used the Tailored Tag Punch to cut out a Basic Black shape which I have attached directly onto the **shape.  I have cut the "You" sentiment out in Whisper White and attached to the black tailored tag shape.

"Happy Birthday" and "to" have been stamped onto Whisper White and cut out individually to make up the phrase.

Tune in tomorrow to see the 3rd card in this lovely set.

Stacey
xx

YOU ARE AMAZING TEXTURES

in , , , , , , , , by Stacey Marsh Independent UK Stampin' Up! Demonstrator, January 25, 2018
Hi all, 

A good week here at Marsh Manor with the return of my regular craft group gatherings last night.  It was great to catch up with friends and hear all about their christmas and new year celebrations.  We get together once a fortnight to craft, chat, eat cake and did I mention chat?  I always look forward to these evenings and it definitely keeps me going mentally as well!

I finally managed a few hours in the craft room last night as well and it was a really productive evening!

My next few posts focus on a few different things, the gorgeous FREE Celebrate You Thinlit Dies and Texture. The dies are part of this years Sale-a-Bration offering and are totally free when you spend £90.  There is even a co-ordinating stamp set which is also free when you spend £45!  Within the framelits product, you have 3 word dies, Amazing, Celebrate and You.  They are a great size for using on cards and would also look great on a scrapbook page too!

I love bringing different textures and dimension to my cards, and there are so many ways that you can achieve this.  How many can you count at a quick glance at this card?
(1)  Embossing Paste to create the brick wall effect. 
(2)  Brusho Powder on Watercolour Card 
(3)  Glimmer Card for added sparkle!

This card features the "Amazing" word die from the Celebrate You Thinlit Dies which I have cut using Basic Black Cardstock.  "You" and "are" come from the co-ordinating Amazing You Stamp Set which I have stamped onto Whisper White Cardstock and trimmed down.  

The Silver Glimmer Paper heart shape is actually the centre of the heart die from the Sunshine Wishes Thinlits Dies(The heart was used on my earlier "LOVE" post).  

For the diamond shape, I have added some Prussion Blue Brusho Powder to some damp Watercolour Paper and spritzed with some more water then left to dry.  The shape is the new Tailored Tag Punch.  

Hope you have an enjoyable Thursday - it's finally nearly the weekend!
Stacey
xx


YAY!

in , , , , , , by Stacey Marsh Independent UK Stampin' Up! Demonstrator, January 24, 2018
Hi all,

Today I am sharing with you two cards that I have made for 2 new team members that joined this week.

My team is known as Stacey's Stampin' Stars so I felt it was only right to include stars on my welcome card designs!


Whenever anyone joins my team,I like to welcome them with a card and a few goodies for them to enjoy. I love celebrating my team's achievements and that starts from the very beginning. I have most wonderful upline who is oh so thoughtful and gives me inspiration all the time on how to support and guide my team! 


For this card I have used the star die from the Mini Treat Bag Thinlits cut out in both Silver Glimmer Card and Basic Black Cardstock.  
The background has been created using an acrylic block to stamp. I have added some Prussian Blue Brushing powder onto a block, spritzed with water and placed directly onto the card.  This is a great technique as it is really simple and effective!  
I have added some doodling around the eye and solve Metallic Thread. 


The ladies that have joined me in January have all enjoyed the amazing joining deal that us available throughout Sale-a-Bration until the end of March. 

A starter kit will cost you £99 and you can choose any products of your choice totalling £130 and on top of that choose an additional 2 FREE stamp sets!! So that's up to £200 of product for just £99. You get all the demonstrator benefits from the moment you join including local crafting workshops, 20% discount and so much more! If this sounds like something you would like to be part of I would be delighted to talk you through it all. 

Stacey
Xx

INTRODUCING PARTY PANDA'S

in , , , , , by Stacey Marsh Independent UK Stampin' Up! Demonstrator, January 20, 2018
Hi all,

It's been a busy old we'll at Marsh Manor with school runs, nursery runs, paid work, new jobs and a leg that keeps giving out under me! Sadly that's meant reduced crafting time but I hope to make up for it this weekend!

I'm sure if you have googled anything to do with Stampin' Up! this year, you would have come across some little pandas as they just seem to be everywhere at the moment!

One of the Sale-a-Bration stamp sets that is available this year is called Party Panda's. They are 3 gorgeous little pandas and a handful of sentiments. I was so excited to have finally got my handso on this set this week!

The options with these guys are endless and are great for any occasion and project!

For this card I have used the new Narrow Notecards which measure 2.5 inches x 4.5 inches so are perfect for sending a little note, or in my case, customer thankyou cards! You get 20 in the set and that includes the envelopes for jus £7.25

For my panda card here, I have kept it really simple with a bit of Petal Passion DSP, a punched circle shape cut in half and a little handstamped and cut panda!

Thanks for reading folks. If you love these little pandas and would like to own welcome then into your crafting world, they are FREE when you spend £45 until the end of March!

Looking forward to a quietish weekend, hopefully having since physio treatment and a spot of afternoon tea Sunday!

Thanks
Stacey

LOVE

in , , , , , by Stacey Marsh Independent UK Stampin' Up! Demonstrator, January 17, 2018
Hi all, 

Well, yesterday was a crazy busy day, I woke up with a Migraine, we had no water and when I finally got to work, I realised that I had taken both mine and the husband's key bundles to work with me, doh!  A nice soak in the bath and a crafting hour was a much needed ended to the day!  Onwards and upwards...

In the Spring/Summer catalogue, Stampin' Up! feature Brusho's which are an intense paint powder that is water-based an non-toxic.  The colours are brilliant and transparent with unique qualities that make it a great medium to look and impressionistic work.  Use wet-on-wet, sprinkling, spritzing and other techniques.  I have owned Brushos for some time now and love getting messy with them so I was really pleased to see that Stampin' Up! have added these to their product offering.  

They have added 5 colours so far which inlude Gamboge, Yellow, Brilliant Red, Moss Green and Prussion Blue.  You will definitely see me using these alot in my work and I'm looking forward to demonstrating these to you!  

On this card, I have used the Brilliant Red.  I have added a few sprinkles of the powder, spritzed with some water and used a Heat Tool to dry.  I usually find that leaving it to dry naturally gives you a better finish but I wanted to make the most of my hour in the craft room!  


The powder is really fine and you honestly don't need much so the pots will just last and last! 

As it is Valentines Day next month I thought this card was very appropriate and even though me and the husband don't actually celebrate the occasion, I might just send it to him!  

I have used the Brushos with Watercolour Paper. Click here to watch a brief video on how to use these powders.  

Using Heart Happiness Stamp SetI have stamped using Real Red Classic Stampin' Pad onto Very Vanilla Cardstock and cut out.  This has been attached to the card using Stampin' Dimensionals.  
The glittery heart and "love" come from the Sunshine Wishes Thinlits and has been cut from Silver Glimmer Cardand Basic Black Cardstock.
The red heart shape comes from the heart die within the Mini Treat Bag Thinlits set.  

To finish, I have added a thin black line around the edge of the Watercolour Paper using a journaling pen and the red hearts is a stamp from the Heart Happiness Stamp Set

Thank you for reading, these products are all currently available in our Spring/Summer and Annual catalogues and until March, when you spend £45 or more, you can choose a free item from the Sale-a-Bration catalogue!

Fingers crossed today is more successful than yesterday!
Stacey
xx

PERENNIAL CALENDAR HANDMADE BY ME

in , , , , , , by Stacey Marsh Independent UK Stampin' Up! Demonstrator, January 16, 2018
Hi all,

I'm really enjoying taking time every few days to craft and add to my blog. It's definitely food for my hair mind. I love a busy life between 2 children, working part time, being a good wife and friend, trying to eat well and not putting you much pressure on myself to spent my spare time cleaning and tidying constantly so escaping to my happy place for a break really is becoming a necessity rather than a dream.... Anyone else feel a bit like that?

I have always wanted to have a go at making one of these calendars and this weekend I just went and did it! Hubby was watching some thing really geeky on TV so I escaped for a bit....


What took the most time was getting the dimensions right and then piecing it all together. I usually follow tutorials online for 2d projects but this one I worked out all out myself and I'm really pleased with the outcome!

The Large Letters Framelits measure 2" tall so I made the blocks a bit bigger to give me room to add the circles behind. They measure 2, 1/4" square.

I have used the following tools to put this little project together
Stampin' Score
Stampin' Trimmer
Envelope Punch Board
Starburst Punch
2" Circle Punch
Large Numbers Framelits

Thanks for reading today,

Stacey
xx

FEELING LUCKY!!

in , , , , by Stacey Marsh Independent UK Stampin' Up! Demonstrator, January 15, 2018
Hi all,

I have been a Stampin' Up! Demonstrator for a little over 4 years now and it just gets better and better.  I am really lucky to have some amazing ladies in my team and I love spending time with them crafting, chatting and generally eating cake, chocolate and sweet treats!

At our team get together this week, my lovely friend Ann suprised me with a gift and a handmade card.  I always enjoy seeing peoples creations and am always inspired by their creativity!


The card features products from the Eastern Palace Suite of products and my favourite Lemon Lime Twist colour!


Thank you for this card Ann, and for the yummy chocolates :-)


If you would like to join my team as a Demonstrator, to build a business or to just enjoy the hobby side of it, now is a great time to join.  For £99 you can choose £130 worth of product PLUS 2 entirely free stamp sets!  Click here to find out more, or send me a message.

Stacey
xx

THINKING OF YOU LILY

in , , , , , , by Stacey Marsh Independent UK Stampin' Up! Demonstrator, January 14, 2018
Hi all,

And so here we are, the last card in my 5-card set of cards focussing on the Remarkable You Stamp Set.  I've really enjoyed sharing with you and I hope you've found them a bit inspiring!

This card is SO simple to make.  Card making doesn't have to be hard, you don't need lots of different embellishments, ribbons and added bits and this is just that sort of card!


The card base here is 4" square.

Onto Very Vanilla Cardstock measuring 3,7/8" sqaure,  I have stamped the lily's image using a Tuxedo Black Memento Ink Pad and added a small amount of colour using Stampin' Blends.

I have cut a piece of Vellum to the same size as the Very Vanilla Cardstock and attached over the top using a dab of Multi Purpose Liquid Glue in each corner.  Once stuck, I have stamped "Thinking of You" onto the Vellum, using a Tuxedo Black Memento Ink Pad.  

I have tied a piece of SIlver 1/8" Ribbon around the card fold and tied in a bow to finish.

I will be sending one of these cards to a lucky reader!  Just leave me a comment and I will pick someone at random!

I wonder what my next project will be???

Stacey
xx

YOU ARE REMARKABLE

in , , , , , by Stacey Marsh Independent UK Stampin' Up! Demonstrator, January 13, 2018
Hi all,

We are nearly at the end of this set of cards and it's been lovely reading your comments on social media, I think you have liked the cards so far!

This one is a bit different for me, as it's all about the technique, rather than plain old matting and layering with punches and embellishments to add the detail.  This one is totally flat apart from the sequins but don't let that fool you into thinking it was a quick card to make!


Okay so here goes...

This card is made from Crumb Cake Cardstock cut and folded to make a 5" square card.  I have added a layer or Berry Burst Cardstock and the top layer that has been stamped onto is another piece of Crumb Cake Cardstock.  

Measurements are:
Crumb Cake card base - 5" x 10", scored and folded at 5"
Berry Burst Layer - 4,7/8" x 4,7/8" square
Crumb Cake top layer - 4,3/4" x 4,3/4" square. 

Do not stick the top layer of Crumb Cake cardstock down until the very end.

Using a Versamark Stamp Pad, stamp the flower image at random around the edge, add White Stampin' Emboss Powder and heat with a Heat Tool.  

Take a Whisper White Uninked Craft Stampin' Pad and an Aqua Painter and colour in every flower.  Leave to dry or use a Heat Tool if you're impatient.  By colouring in with white before moving on to the next bit, you get a more vibrant colour on the cardstock.  If you have stamped onto White card then you won't need to do this first part. 

Next, with a Berry Burst Classic Stampin Pad and using an Aqua Painter, add colour to the flowers, using a more concentrated colour at the bottoms.  Leave to dry or heat with a Heat Tool as before.  

Taking a Whisper White Uninked Craft Stampin' Pad stamp with a sentiment of your choice.  I have used the main sentiment from the Remarkable You Stamp Set.

If you look closely, I have added splashes of White across the flowers, which has been done with an Aqua Painter, and a Whisper White Uninked Craft Stampin' Pad.  The black lines around the edge have been drawn with a Journaling pen to finish.  

I think this card would look good in a variety of different colour combinations and for any occasion.  

Hope you're enjoying a relaxing Saturday!
Stacey
xx


GOOD THINGS ARE GOING TO HAPPEN

in , , , , , , , by Stacey Marsh Independent UK Stampin' Up! Demonstrator, January 12, 2018
Hi all,

Wow that was a busy few days for me, a busy day at my "paid" employment, a trip to Bluewater, and a team training event but I'm back with card number 3 of my "Remarkable You" set....and the return of those hand cut leaves!

This card is made from a sheet of Crumb Cake A4 Cardstock measuring 4, 1/8" x 11,1/2", scored and folded at 5,3/4".  
The purple layer is a piece of Rich Razzleberry Cardstock.
To create the background, I have stamped the leaf image from the Remarkable You Stamp Set (available in Wood Mount and Clear Mount options) using Old Olive Classic Stampin' Pad.  I have edged the Very Vanilla Cardstock using ink from a Crumb Cake Classic Stampin' Pad and a Sponge Dauber.  I have then drawn a free-hand line around the edge using a journalling pen.

The additional leaf has been stamped using a Tuxedo Black Memento Ink Pad and coloured in using the two Old Olive Stampin' Blends.  I have carefully cut the leaf image out using scissors and attached to the Basic Black Cardstock layer using Mini Stampin' Dimensionals

The "Good Things Are Going To Happen" sentiment comes from the You've Got This Stamp Set (available in Wood and Clear Mount options) and has been stamped onto Very Vanilla Cardstock using a Tuxedo Black Memento Ink Pad.  I have punched this out using a 2" Circle Punch, and added some Crumb Cake edging with some free-hand stitching using a journaling pen again.  

Using the Starburst Punch, I have cut a piece of Old Olive Cardstock and layered this with the sentiment, attaching to the card using Stampin' Dimensionals. To finish, I have added some sequins from the Metallic Sequin Assortment. 

Thanks so much for reading, I would love to know which one is your favourite from the set so far, 1, 2 or 3??


Thanks!
Stacey
xxx

HAPPY BIRTHDAY TO YOU

in , , , , by Stacey Marsh Independent UK Stampin' Up! Demonstrator, January 10, 2018
Hi all,

Today I bring to you my 2nd card from a set of cards I have made using the Remarkable You stamp set.

This time a "Happy Birthday" card!


For this one you have a Very Vanilla Cardstock card blank with a smaller sheet of same coloured Cardstock as a layer attached. I have edged this piece of card beforehand with some ink from a Crumb Cake Classic Stampin' Pad.

This piece of Cardstock has also been watercoloured slightly using a Soft Sky Classic Stampin' Pad and an Aqua Painter to find the washed background effect.

The main Happy Birthday sentiment comes from a step set called Big on Birthdays and or had been attempted using a Tuxedo Black Memento Ink Pad. The "To You" addition is a smaller stamp from the same set.

I have stamped the flower and leaves images into a separate sheet of Very Vanilla Cardstock using a Tuxedo Black Memento Ink Pad, coloured using Stampin' Blends and cut out with scissors.  I have them attached to the card blank having Stampin' Dimensionals to give added depth. The black line has been added using a journaling pen.


I hope you like!

Thanks
Stacey
xx

THINKING OF YOU

in , , , , , , , , by Stacey Marsh Independent UK Stampin' Up! Demonstrator, January 09, 2018
Hi all,

One thing I have challenged myself to do this year is to make a number of cards/projects with one stamp set being the main focus.....this should give you (and me) a good idea of the different ways you can utilise a single set, and help stretch my imagination!  Well that's the idea anyway!

Todays card is using the Remarkable You stamp set which is just gorgeous! You get 4 large stamps and 2 sentiments. It comes in both Clear and Wood Mount options.


I spent some time crafting with my Mum last week, and recently she has been more into quilting than paper crafting, and she asked how is it I can come up with these ideas so easily?  The idea is that I don't.....

As always, before starting with any product, I like to have a little look online to gather some ideas to aid the flow of inspiration and I must say Pinterest did not disappoint, this is clearly a much-loved set!

​As i mentioned earlier, my challenge is to make a number of projects with each stamp set and this is my favourite card from my first play with this set!


This card is made from a card blank measuring 4, 1/8" x 5,3/4" that I have cut from an A4 sheet of Crumb Cake A4 Cardstock.


The Black and White Striped DSP is from the Petal Passion​ collection.

To create the blue background I have spritzed some Watercolour Paper ​and added a wash of  ink from a Marina Mist Classic Stampin' Pad using an Aqua Painter ​and dried with a Heat Tool. To create the black dots I have splashed from a distance some Basic Black Archival Stampin' Pad on the tip of an 
Aqua Painter.

I have stamped the flower using a Tuxedo Black Memento Ink Pad onto Very Vanilla A4 Cardstock and cut around it with scissors, leaving a small outline. This has then been coloured in using Stampin' Blends and attached to the background using Stampin' Dimensionals to give some added dimension.

I have tied some 5/8" Burlap Ribbon around the card and secured with some Tear and Tape Adhesive to keep in place.

​The sentiment comes from the Lots of Love Stamp Set  and here it has been stamped onto 
Very Vanilla Cardstock and punched out using the 2 inch Circle Punch. Using the Starburst Punch, I have cut a shape in Basic Black A4 Cardstock and attached to the card using Stampin' Dimensionals

To finish, I have added some Silver Sequins​ from the Metallic Sequin Assortment randomly


My usual stamping style is to stamp directly onto White / Vanilla but I really do think the combination of the Blue and Purple makes the flower pop!  

Thanks for reading ladies and gents.  If you would like to try out any of these techniques I have tried on this card, why not try one of my classes?

Stacey
xx

HAPPY BIRTHDAY MEETS WATERCOLOURING

in , , , , , by Stacey Marsh Independent UK Stampin' Up! Demonstrator, January 07, 2018
Hi all,

A Birthday card is the number 1 reason for making cards and with new products they just don't get boring to make!  This card was made for one of my lovely friends and team member who celebrated her birthday this week.  


​This stamp comes from a new set called Birthday Wishes and was one of the first products that jumped out of the new Spring/Summer catalogue when I first had a look at in back in November lasy year.  It's a great size and means that you don't need to dress it up too much. It comes with an extra sentiment that I have used inside that says "With Many Wishes Just For You" . I definitely think you are going to see a lot of this one around!

To make this card:
Happy Birthday has been stamped onto Watercolour Paper using Versamark which I have them heat-embossed with black embossing powder. The confetti has been added in the same way with Silver Embossing Powder and a stamp from the new Picture Perfect Birthday Stamp Set.

To add the wash of colour , I have spritzed the card lightly and then using an Aqua Painter and a Berry Burst Ink Pad I have brushed the colour across. This can be left to one side to dry but I prefer to dry with a heat tool straight away. I find that this avoids any drips of ink where you don't want them.

Behind the 
Watercolour Paper I have embossed a piece of Basic Black cardstock using the new Simple Stripes Textured Impressions Embossing Folder.

The verse comes from 
Picture Perfect Birthday Stamp Set.  I have stamped this onto Whisper White cardstock and punched out using the Everyday Label punch. To add the Black layer, I have cut 2 more in Basic Black cardstock. Cutting one in half, I have attached to the reverse of the original so that your can see a border of black at the top and the bottom of the label shape. Taking the 2nd Basic Black label shape, I have attached this to the reverse to cover up the gap.

Using some Silver 1/8" Ribbon I have added this to the label shape using a staple to secure and attached to the card using Stampin' Dimensionals to add some more depth.

All of these products are available to buy now by clicking shop now. Remember all orders of £45 or more mean you can add a free Sale-a-Bration item!


Stacey

xx

YOU ARE SIMPLY AMAZING!

in , , , , , , by Stacey Marsh Independent UK Stampin' Up! Demonstrator, January 07, 2018
Hi all,

One of my favourite things to do at this time of the year is to make desk / hanging calendars.  You can pick up the calendar tabs from most card shops, and craft stores at this time of the year, or if you are really clever, make your own!  (I'm not that clever so I bought mine!)

I also love to put into my catalogue mailings little gifts, be it a card, or something like this!  If you have received your catalogue this week, what did you get?


These calendars really are so simple to make and took me hardly any time at all to put together. You can even get 2 out of an A4 sheet!


The base is made from Basic Black Cardstock measuring 4, 1/8" x 11, 1/2".

With the card base placed lengthways in your scorer, score at 5", 5, 1/2", 6" and 11".  Fold around and secure with the left-over tab at the end. 

I have used some of the new Petal Passion Designer Series Paper  which is actually just a black and white monochrome DSP, but I have added colour with the new Stampin' Blends to lift it off the page.  (I'm actually quite impressed with my colouring too!). 

The stamp is from a new Sale-a-Bration freebie set called "Amazing You" and I have punched it out with a 2" circle punch and the Starburst Punch to lift it off the DSP. 

I hope you like!

All the products are available now, and remember with Sale-a-Bration you can earn stamp sets, DSP, embellishments and Dies all for FREE!! 

Stacey
xx

TREAT YOURSELF

in , , , by Stacey Marsh Independent UK Stampin' Up! Demonstrator, January 05, 2018
Hi all, 

Today I am bringing you a change from the norm with a 3D project instead of the usual cards!  Yup, I am going crazy ha!  

Stampin' Up! offer such a wide range of products that you can use for gift packaging and one of the things that I really like are their Clear Tiny Treat Boxes.  They measure 2" square, and cost £6.95 for 16 (that's 43p per box!) and are great for filling with sweet things to share on a table, or as a "just because" gift.  I recently gave these out as teacher gifts alongside a card for Christmas.  
This treat box is filled with mints, which is great for the non-chocolate lover!

I have added some strips of DSP from the new Picture Perfect Birthday 6" x 6" DSP stack around the box, leaving the top clear so the receiver can see what's inside, and tied with some ribbon and bakers twine to secure. 

To create the tag, I have used a selection of punched shapes and a sentiment from the new Picture Perfect Birthday Photopolymer Stamp Set which is just perfect for these things, "Treat Yourself".  
All of these products are currently available to buy now and with Sale-a-Bration under way right now, you can choose a FREE Sale-a-Bration item with any order of £45!
As always, thank you for reading, have a great weekend!
Stacey
xx


CLEARANCE RACK

© STACEY MARSH · THEME BY WATDESIGNEXPRESS