HAPPY BIRTHDAY TO YOU BIRTHDAY CLUB CARD

in , , , , , , , , , by Stacey Marsh Independent UK Stampin' Up! Demonstrator, August 27, 2018
Hi all,

As a demonstrator I am part of a big worldwide team of other demonstrators and they are all amazing in their own inspiring way. I treasure my time at national events and I feel so lucky to have met you all. At first, walking into a room full of people you have watched online, was the most nerve wracking thing but within minutes I had been taken in and felt I'd known people for years!

This year, myself an some other demonstrators started an August birthday club. The idea behind it being that as we all have birthdays in the month, we would make a card and send a card.

It was quite exciting seeing all the cards land on the door mat and of course I was a good girl and waotedveru patiently to my birthday to open them all.

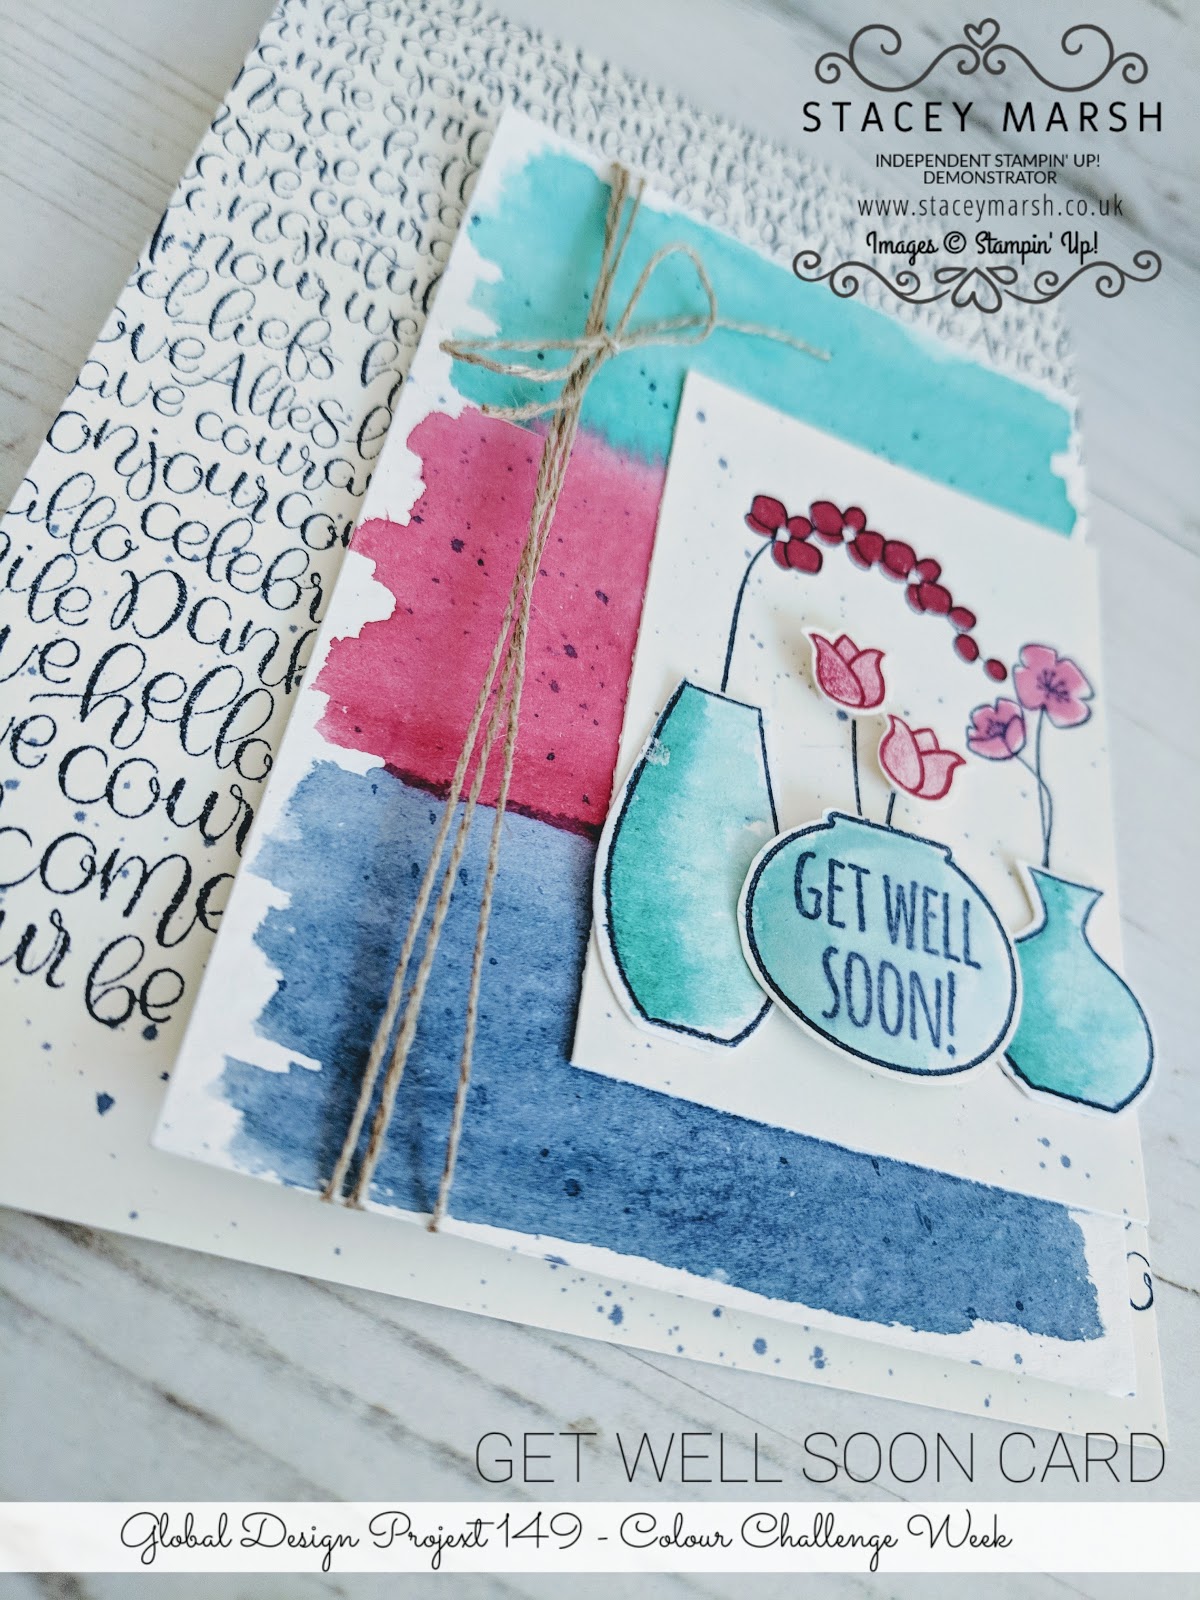
This was my offering....

I won't spoil the surprise of all the cards I received until the other demonatrators have posted their own cards online but they were all stunning with everyone creating something totally unique and inspiring. 

Thank you ladies for including me in this, looking forward to next year!! 

Stacey
Xx
Hi all,

Today's card is a special one that I made for a lovely couple that have recently celebrated their 40th Wedding Anniversary together.  Such a wonderful reason to make a special card and I hope the couple had the most wonderful celebration of life together so far.  Traditionally a 40th Anniversary is associated with Rubies, hence the red theme to this card!

Please note - some of the products that I have used to create this card have been discontinued. 


I have used the Scattered Seqins Embossing Folder to add texture to the Whisper White Cardstock that I have used on the card front.

I have used the Layering Squares Thinlits Dies to create the Red Glimmer Paper frame.  I have attached a square of Whisper White Cardstock that has been die-cut using the Stitched Shapes Framelits at an angle over the top with Stampin' Dimensionals.  

I have stamped the two numbers onto a seperate piece of Whisper White Cardstock and die-cut out using the Large Numbers Framelits DiesThese have been attached onto the square at the front and I have used the Brilliant Red Brusho to splash some ink across.

 "Congrats" has been die-cut using the Sunshine Wishes Thinlits Dies in Basic Black Cardstock and attached with a Mini Glue Dot at either end.

To finish, I have stamped "Happy Anniversary" and cut into individual word tiles and attached to the card front using Stampin' Dimensionals.  


I know that a number of you have number dies so I wanted to showcase this card.  It isn't always about the products used, but more about the card style and theme.

I hope you're all enjoying a good weekend!

Stacey
xx

YOU ARE MY AMAZING FRIEND WITH FALLING FLOWERS AND MAY FLOWERS FRAMELITS

in , , , , , , , by Stacey Marsh Independent UK Stampin' Up! Demonstrator, August 18, 2018
Hi all,

I hope you're all enjoying the weekend so far!

#makeacardsendacard isn't just about cards for the usual occasions such as Birthdays and Anniversaries.  I probably send more cards out to friends, customers and loved ones just because they are in my thoughts or to say thank you for something they may have done.

I do feel very blessed to know so many amazing people and I am proud of every single one of my friends for their own special reasons.  If my richness in life was measured by the people I am surrounded by then I consider myself a very wealthy person.  Crafting is not only a hobby and a business, it gives me a general release from the stresses of day to day life and because of this, I have met some wonderful people who I now class as my friends.

Todays' card will be sent to one of these people "just because" they are amazing!  Made with one of my very favourite colours, Lemon Lime TwistI have kept it really simple with some stamped leaves from the Falling Flowers Stamp Set.  I have stamped the three images side-by-side using my Stamparatus Stamping Platform.  I have stamped another onto a seperate sheet of Whisper White Cardstock and die-cut out using the co-ordinating May Flowers Framelits Dies.  I have attached this using Stampin' Dimensionals over the top of the middle image.


 I have die cut the word "Amazing" from the Celebrate You Thinlits Dies in Silver Glimmer Paper and attached onto the card front.  The words "You Are My" come from the Sunshine Sayings Stamp SetThese have been stamped onto a piece of Whisper White Cardstock, cut out into a single tile and attached using Stampin' Dimensionals"Friend" comes from the Thoughtful Banners Stamp Set and has been stamped directly onto the card front.

All of these products can be purchsed now online by visiting my online shop.  For orders that total £45 (exclusing postage and packing), you will receive a £4.50 voucher that can be redeemed in September when you place another order!


Have a great day!
Stacey
xx

FANCY FOLD FRIDAY NO.11 - DOUBLE BIRTHDAY CARD IN ONE

in , , , , , , , , by Stacey Marsh Independent UK Stampin' Up! Demonstrator, August 17, 2018
Hi all,

I hope you have all had a great week!  It's been a lot less busy in this house this week so I've managed some crafting time, although I was turfed out Wednesday evening when the hubby needed to make my birthday card with the children!  Looking forward to sharing that one with you this weekend!

It feels like these Fridays are coming around so quickly at the moment  The Fancy Fold that I have for you today is a double birthday card in one. 


Starting with a regular sized card blank in Blackberry Bliss Cardstock (this is really hard to photograph well as it tends to look more black than the deep purple that it is).  I have folded the card, and inside, attached a smaller card (in Whisper White Cardstock).  This has only been attached to the back page of the card, leaving the front to open out more. 


On to the inside Whisper White card, I have stamped the main image from the Accented Blooms Stamp Set using a Tuxedo Black Memento ink pad.  I have chosen to keep the colouring to a minimum on this piece.

Onto a scrap of Blackberry Bliss Cardstock , I have used Versamark to stamp the "Happy Birthday" sentiment, added White Stampin' Emboss Powder and used a Heat Tool to set the powder.  I have then used the Tailored Tag Punch to cut the shape out and attached to the centre of the image using Stampin' Dimensionals.  
 For the front of the card, I have used the Layering Squares Thinlits Dies to cut out a square apperture where the image behind can be seen through.  Using the same die and the larger scalloped sqaure die, I have cut out a frame in Whisper White Cardstock.  This has been attached to highlight the apperture. 

Onto a seperate piece of Whisper White Cardstock, I have stamped the image again, coloured in using Stampin' Blends Markers and cut out.  I have re-attached sections of this image to overlap the front. 


To finish, I have stamped one of the corner images from the Around The Corner Stamp Set in the bottom right of the card front.  This has been done with Versamark and White Stampin' Emboss Powder to match the sentiment that has been stamped inside. 

Fancy Fold's really don't have to be complicated and this is a really effective way of creating a slightly different type of card opening.  I hope you like it!

Have a great weekend!
Stacey
xx 


HAPPY BIRTHDAY WITH PERENNIAL BIRTHDAY AND BLUEBERRY BUSHEL

in , , , , by Stacey Marsh Independent UK Stampin' Up! Demonstrator, August 16, 2018
Hi all,

Another quick card from me this morning, this time using one of my most popular stamp sets, Perennial Birthday.  This stamp set was launched in the Spring/Summer seasonal catalogue earlier this year and i'm so glad that it has made it into the Annual catalogue!  I particularly like that the Happy Birthday font isn't too feminine, which is great for those tricky male cards.

I'm still enjoying using the new in-colours, and this one is all about Blueberry Bushell.  I was quite sad to have lost Dapper Denim from our in-colour catalogue, but oh so pleased when they gave us this vibrant not quite royal blue, bot quite navy blue colour.  For this card I have stamped all the images using the Blueberry Bushell Classic Stampin' Pad.  


I have used a Sponge Dauber to add some ink to the centre of the flowers.  The sentiment has been stamped onto a strip of Whisper White Cardstock and cut out into two seperate word tiles. I have then attached these to the card front using Stampin' Dimensionals.  


Thanks for reading!

Have a great day!
Stacey
xx

YOU ARE AMAZING WITH MAYFLOWER FRAMELITS

in , , , , , , by Stacey Marsh Independent UK Stampin' Up! Demonstrator, August 15, 2018
Hi all,

A quick little 4" square card from me today.  I mentioned a few weeks ago that because it is the summer holidays here, crafting time is more limited than it usually is so quick cards are the way forward to me at the moment, and this is just that!  I find small cards are great for using up small scraps of cardstock that we just can't bring ourselves to throw in the bin! 


This card is made from a 4" x 8" piece of Petal Pink Cardstock that has been folded at 4" to form the card base.

I have used a 3, 3/4" square piece of Smoky Slate DSP from the Neutrals Colour Collection.  Pink and grey are two of my favourite colours to put together!  I have cut a smaller piece of Whisper White Cardstock measuring 3" square and attached onto the card front. 

Over the top of the Whisper White, I have added a layer of Vellum measuring 3, 1/2" sqaure and attached at an angle.

The large flower is part of the Mayflower Framelits Dies set and has been cut out in Basic Black Cardstock and attached onto the card front.

Using the Celebrate You Thinlits Dies, I have cut out the word "amazing" from some Silver Foil and attached using a glue dot.  "You are" comes from the Thoughtful Banners Stamp Set and has been stamped onto Whisper White and cut out.

To finish, I have added some Metallic Sequins.

I'm looking forward to sending this card out to someone very special! 

Have a great day!
Stacey
xx

GLOBAL DESIGN PROJECT #151 - THEME CHALLENGE

in , , , , by Stacey Marsh Independent UK Stampin' Up! Demonstrator, August 13, 2018
Hi all,

I hope you all had a lovely weekend!

Over at the Global Design Project, it is a theme week!

Now if i'm totally honest with you, I found this challenge really difficult!  Mostly because looking at my inventory of product, I am lacking on the sea themed products!!  However, I am not the giving up kind so here is my entry!


I have stamped a strip of Whisper White Cardstock with a wash of colour image that is part of the Beautiful You Stamp SetI have stamped this image across the cardstock using Balmy Blue ink (really similar to the old Marina Mist colour).  I have used 1st, 2nd and 3rd generation stamping to give the varying colour brightness.  This strip of cardstock has been attached to the card base. 


Onto a seperate piece of Whisper White cardstock, I have stamped the Jar of Love Stamp Set four times in Pumpkin Pie ink.  These have been cut out and attached to the card front using Mini Stampin' DimensionalsThe sentiments that I have used also come from this stamp set. 

To get the splatter of ink, I have used some Balmy Blue ink with a really full Aqua Painter and tapped it lightly across the cardbase.  I have added some random sequins from the Iridescent Sequin Assortment to add a bit of sparkle. 


To finish, I have added some Burlap Ribbon attached to the card with a small staple and tied with some Linen Thread

Looking forward to seeing what everyone else comes up with for this theme.  It's always nice to have a bit of an unusual one to make you think differently about your crafting.  This one definitely made me think outside of my usual craft box!

Have a great day!
Stacey
xx

TO THINK OF YOU IS TO SMILE LAYERED CIRCLE CARD

in , , , , , , by Stacey Marsh Independent UK Stampin' Up! Demonstrator, August 11, 2018
Hi all,

The weekend is finally here!  I hope you've got something fun planned, or maybe just some quiet time with a bit of crafting?!  Whatever you have planned, I hope it's a good one for you!


Today's card features some products from last years annual catalogue that I have finally gotten around to playing with.  I loved this set when I saw it originally and there is so much inspiration all over the internet. The images are from the Falling Flowers Stamp Set and these co-ordinate with  the May Flowers Framelits Dies


I have kept it relatively simple today with some stamping and die-cutting of the leaves and two of the flower images.  I have used two layers of Whisper White Cardstock and the Layering Circle Framelits Dies to cut the circle appertures.  The top layer has been embossed with the Quilt Top Textured Impressions Embossing Folder and then attached to the layers.

Once attached, I have stamped the sentiment which is part of the  Eastern Beauty Stamp Set.  After stamping, I have then attached the die-cut pieces to finish.

Thanks for reading, I hope you liked this one!

Have a great day!
Stacey
xx

FANCY FOLD FRIDAY NO 10 - STAR SHAPE ORIGAMI MULTI FOLD BOX WITH TAG

in , , , , , , , by Stacey Marsh Independent UK Stampin' Up! Demonstrator, August 10, 2018
BHi all,

It's been a busy week here at the Marsh Manor with school holiday plans, getting things ready for my cousin who marries the love of her life this weekend and yesterday yesterday we took time as a family to celebrate the life of my Grandad and lay him to rest.  It was a wonderful funeral service full of love, kind words  and memories that we all cherish very dearly.  For some reason, it didn't feel right to post and I didn't really have the mindset to think about crafting, and that's okay.

Today is a new day and another Fancy Fold Friday for you all.  This one is based around Origami folding to create a star shaped box.  I have included a video at the bottom to showcase it better as it is really hard to photograph well!


I have created this box with Twinkle Twinkle Designer Series Papers measuring 8" x 8" square. 
To decorate, I have created a tag using the Scalloped Tag Topper Punch, a strip of matching DSP along the bottom, and some stamping of course!  The images come from the Tabs for Everything Stamp Set and the Thoughtful Banners Stamp SetThe banner on the front has been cut out using the Duet Banner Punch.  

To finish, I have attached the tag to the gift box using some Linen Thread

This box will be part of my Christmas Class taking place in November that will showcase new products from the Autumn / Winter Catalogue which launches on the 1st September, along with other christmas gifts for the season. 


Thanks so much for reading, I hope you like it!

Have a great day!
Stacey
xx

TEXTURES OF PETAL PALETTE THANK YOU CARD

in , , , , , , , , , , by Stacey Marsh Independent UK Stampin' Up! Demonstrator, August 08, 2018
Hi all,

Having a lovely week so far here at Marsh Manor and managing some craft time which is always a good thing!

Todays card features lots of different textures and I have used the Petal Palette Stamp Set for the main flower and sentiment.

For this one I have used an Aqua Painter to add a wash of colour to the background.

The diamonds have been created with Texture Paste, some Calypso Coral ink and a mask.

The specks on the top have been created using the Gamboge Brusho and a water spritzer .

I have stamped the flowers onto Whisper White Cardstock, coloured in using Stampin' Blends Markers and then cut out.

Before attaching to the card I have swirled some Gold Metallic Thread and then stuck to the card front using Stampin' Dimensionals.
The

I quite like the colours on this one, all different shades of orange and a bit of gold to add that finishing bit of shimmer!

Have a great day!
Stacey

FLORAL STATEMENTS MEETS LOVELY LIPSTICK

in , , , , , , , , by Stacey Marsh Independent UK Stampin' Up! Demonstrator, August 07, 2018
Hi all,

Here is another card using the same Floral Sentiments Stamp Set and a slightly different technique for you...

For this one, I have stamped the image onto a square of Whisper White Cardstock.  To achieve the look that the flowers are bigger than the square, I have cut the square down once the image has been stamped.  This is achieved by being very careful with your trimmer to avoid cutting the flowers off completely!


I have coloured the flowers using Stampin' Blends Markers and then attached to a layer of Lovely Lipstick Cardstock and Basic Black Cardstock.  I have repeated this colour combination again and attached to the card base.


To finish, I have tied some 1/2" Black Satin Ribbon to secure.

Which one of the two cards is your favourite?

Have a fab day!
Stacey
xx
Hi all,


I hope you have all had a lovely weekend.  It's so nice that the sun is still shining and the days are lovely and warm, and what a change from the usual British Summer time weather we experience!


As some of my followers know, I often participate in a blog challenge called "The Global Design Project".  This is a great challenge for anyone to take part in.  The themes change weekly and the entries are always a fantastic source of inspiration! 

This weeks challenge is a colour theme one, designs are totally up to the participant as long as you use the colours that they have picked.  This week it is Bermuda Bay, Lovely Lipstick and Night of Navy.  These are most definitely NOT colours that I would have put together in my everyday crafting, but all the same, the challenges are designed to take you away from your usual crafting!

Here is my entry...

 I have used the Handwritten Stamp for the background in Night of Navy ink.  

Onto a piece of Watercolour Paper, I have used an Aqua Painter to paint a wash of all three colours chosen.  One dry, I have splashed some Night of Navy ink across.  I have wrapped some Linen Thread around the piece of paper, and attached straight onto the card base using some Stampin' Dimensionals


For the sentiment, I have stamped two of the vases from the Varied Vases Stamp Set onto Watercolour Paper, used the Vase Builder Punch to cut out and coloured in using an Aqua Painter and the Bermuda Bay Classic Stampin' Pad

The vase with the sentiment on comes from the Treat Time Stamp Set and when I saw this one I knew that it would work so well with the images in the Varied Vases Stamp Set.  

The flowers have been stamped directly onto the background and coloured in with the in-fill stamps and some more water colouring.


This challenge changes weekly every Monday so be sure to add it to your reading list or go-to place for inspiration for your crafting. 

Thanks for reading!  Wishing you a lovely week.

Stacey
xx

FLORAL STATEMENTS MEETS MANGO MELODY

in , , , , , , , by Stacey Marsh Independent UK Stampin' Up! Demonstrator, August 05, 2018
Hi all,

I hope you are all enjoying a great weekend!

For today's card, I am sharing a Thank You card.  The main image of this card comes from the Floral Statements Stamp SetI have stamped this image using Tuxedo Black Memento Ink, and coloured using a selection of Stampin' Blends Markers. I have then cut this image out, and attached to a piece of Whisper White Cardstock using Stampin' Dimensionals


Onto this piece of Whisper White Cardstock, I have stamped the semi-circle strip image from the Varied Vases Stamp Set along the top and bottom.  The sentiment comes from the same stamp set and this has also been stamped using Tuxedo Black Memento Ink.  


I have used a standard card base cut from Basic Black A4 Cardstock, added a layer of Mango Melody Cardstock and attached all together.  To finish, I have used an Aqua Painter to splash some black ink across the front, and added a few sequins randomly across the front.


I think Mango Melody Cardstockis going to be one of my new favourite colours to use as it really is so rich and vibrant, and I imagine would go with everything!

Enjoy your Sunday!

Stacey
xx

ALWAYS THINKING OF YOU WITH TREAT TIME FLOWERS

in , , , , , by Stacey Marsh Independent UK Stampin' Up! Demonstrator, August 04, 2018
Hi all,

Following on from yesterdays Fancy Fold post, I have put together another card using the same colour combination - Highland Heather, Whisper White and Basic Black.

Some would say that matting and layering isn't my usual style, however I'm really pleased with how this one came out. 

I have used one of the smaller seperate pieces from the Delightfully Detailled Speciality Laser Cut Designer Series Papers and added the large oval shape from the Stitched Shapes FramelitsI have stamped 3 flowers from the Treat Time Stamp Set in Highland Heather, cut out, and attached to the centre of the oval using Stampin' Dimensionals.  


The sentiment comes from the Accented Blooms Stamp Set which has been stamped onto a scrap of Whisper White, added a piece of Highland Heather Cardstock behind, and attached to the card front using Stampin' Dimensionals.  


To finish, I have tied a piece of 1/2" Black Satin Ribbon and secured with a bow. 

Have a great day!
Stacey
xx
Hi all,

Hope you have all had a good week.  It's been lots of fun here with picnics in the park with friends, mini golf and trips to Rochester Castle for a bit of culture with my girls.  All in the sunshine too, how lucky are we?!!

Fancy Fold Friday here today, and this one is a double folded 3D card that even folds flat for posting.


Cut a standard card base in Highland Heather Cardstock measuring 4, 1/8" x 9, 1/4"
Score and fold at 5, 3/4", 6, 3/4", 8, 3/4".  Attach the 1/2" flap to the card base at 2".

Cut a piece of Whisper White cardstock to measure 3, 7/8" x 1, 3/4", stamp a pattern and attach to the lower part of the card.

Cut a piece of Whisper White cardstock to measure 3, 7/8" x 3, 1/2", stamp a pattern and attach to the tall part of the card.


I have used a piece of the Delighfully Detailed Laser Cut Speciality Designer Series Paper, and attached to the main front of the card.  The lady image comes from the Beautiful You Stamp SetHer body has been coloured in using the Ivory Stampin' Blend Marker, and her hat with the Rich Razzleberry Stampin' Blend Markers  For her dress, I have stamped the image onto Highland Heather Cardstock, stamped over with the Flower Image using a Highland Heather Classic Stampin PadThis has been cut out, and attached to the original image, and attached to the card using Stampin' DimensionalsUnderneath, I have swirled some Silver Metallic Thread.  

The sentiment also comes from the Treat Time Stamp Set.  

Additional Products Used:


Tune in next week for another fancy fold project!

Have a great weekend!

Stacey
xx

HAPPY 18TH BIRTHDAY

in , , , by Stacey Marsh Independent UK Stampin' Up! Demonstrator, August 02, 2018
Hi all,

Today's card is again showcasing some of the stamps from the Picture Perfect Birthday Stamp Set, in particular the candle images.

I have stamped 18 candles in varying colours including Gorgeous Grape, So Saffron, Balmy Blue, Flirty Flamingo and Mint MacaronI have cut the candles out and attached them to the card in a row using Stampin' Dimensionals. The flames have been stamped onto the card base using Mango Melody.  


I have used a retired set of dies and stamps for the numbers and sentiments to finish!

The lines have been hand drawn using a black marker.

Hope you like it!
xx


CLEARANCE RACK

© STACEY MARSH · THEME BY WATDESIGNEXPRESS