HAPPIEST OF BIRTHDAYS TO YOU WITH PICTURE PERFECT BIRTHDAY

in , , , , , by Stacey Marsh Independent UK Stampin' Up! Demonstrator, July 31, 2018
Hi all,

For those of you that follow me on Facebook I posted yesterday about now that it is the summer holidays, although that means more family time, no alarms and less rushing about, it also means less time to craft. 

Saying that, I do have a card class planned on the 21st August, a birthday card club that I am part of to create lots of cards for, a farmers market to prep cards for and there is a brand new catalogue coming so I must plan some quality crafting time!

Today's card is a quick one that I put together last night because I needed to craft and didn't have a great amount of time. 


I have used the Picture Perfect Stamp Set for everything on this card. It's a great set and I really like the font for the sentiments!

I have chosen to use So Saffron for the colour of this card along with some Whisper White and Basic Black.  

The candles are individual stamps that I have lined up in a row and stamped.  The flames have been added after and I have stamped the sentiment over the top.  These have been die-cut using the Layering Squares Thinlits Dies to finish. 


Hi all,

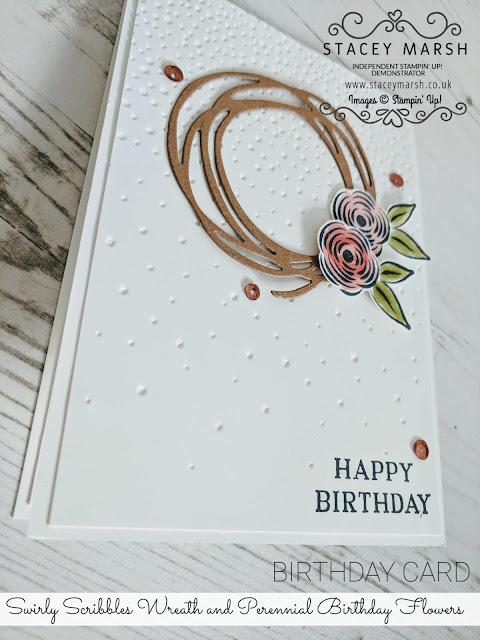
I recently re-discovered the Swirly Bird Stamp Set and Swirly Scribbles Thinlits Dies that go with it. It is such a versatile set of products and the combinations are endless.  I'm sure with a quick search of the stamp set or dies you will see an array of gorgeous cards and projects!

Today's card features one the dies that I have used to create a wreath design.  This is quite popular for christmas cards too which i'm sure you will start to see here very soon!

The base of this card has been put together using Thick Whisper White Cardstock.  At a recent card class, one of my ladies remarked how strong this card for card bases, hurrah!


The card front measures 10.5cm x 14.8cm, so you can get two card bases out of 1 A4 sheet of cardstock.  To create the background, I have cut a piece of regular thickness Whisper White Cardstock measuring 10cm x 14.3cm, and run it through the Softly Falling Embossing Folder.  Usually you see this used with the raised dots showing, however this time I have chosen to use the de-bossed side.  The options with embossing folders are endless too!


For the wreath, I have used the die to cut out some Kraft card, and attached this to the card front using two or three Mini Glue Dots.  

To make the flowers, I have stamped two flower images from the Perennial Birthday Stamp Set onto Whisper White Cardstock using a Tuxedo Black Memento Ink Pad and coloured in using Stampin' Blends Pens.  Both have been cut out with scissors and added to the card seperately, 1 with Stampin' Dimensionals and the other with a Mini Glue Dots.to vary the depth of the card design. 

To finish, I have added the "Happy Birthday" sentiment from the Perennial Birthday Stamp Set at the bottom and added a few Metallic Sequins for a bit of shimmer!
What do you think?


Have a great day!
Stacey
xx

COLOURING WITH LOVE WHAT YOU DO

in , , , , , , , , by Stacey Marsh Independent UK Stampin' Up! Demonstrator, July 18, 2018
Hi all,

I hope you all had a wonderful weekend.
This is the last week of the school year for me so it's a bit crazy here with finishing up work, getting the girls all sorted for the end of term and trying to remain calm!

Today I am sharing with you a Thank You Card that I have put together to share with a few people I wish to thank at the end of term.

For this card, I stamped a whole sheet of A4 Whisper White cardstock with the main flower image from the **NEW** Love What You Do Stamp Set followed by the dotty flower image, leaves and finally the dots from the Perennial Birthday Stamp Set. I coloured the images in roughly using Stampin' Blends and then cut up to form the background for these cards.


I have stamped the flowers again on a seperate piece of A4 Whisper White cardstock , coloured again and then cut out.


For the sentiment, I have stamped "Thank You" and cut out using the Tailored Tag Punch. I have cut out a piece of Basic Black cardstock using the Starburst Punch and layered together using Stampin' Dimensionals and added the cut out flower between. To finish, I have added a few Metallic Sequins.

Because I stamped a whole sheet of A4, I was able to bulk create 4 cards with just two additional sheets of Thick Whisper White Cardstock to create the card bases.

I hope you have a great day!
Stacey
xx

FANCY FOLD FRIDAY No.9 - SMALL TOTE BAG

in , , , , , , , by Stacey Marsh Independent UK Stampin' Up! Demonstrator, July 13, 2018
Hi all,

Where has this week disappeared to, it feels like just yesterday it was last week's Fancy Fold Friday!

It was my monthly card class on Tuesday, and this month was all about the Eclipse Card!  Whenever anyone comes to my class, I always like to include a little something extra just to say thank you for coming and to show my appreciation.

This month, I put together a lovely little tote bag using some DSP from the Twinkle Twinkle collection that we used to make one of the cards.  I filled these with some delicious sweets for my ladies to enjoy whilst crafting the evening away!


These bags are made from sheets of DSP folded round a small tray that has been made up using cardstock and are so simple to put together!  The handles are just folded over and glued. 

 To decorate, believe it or not I have created the tag using the Balloon Bouquet Punch!  I have stamped the sentiment from the Treat Time Stamp Set.  The whole for the thread has been cut using the 1/8" Circle Punch and I have used Linen Threat to secure around the handle.  The flower comes from the Pop of Petals Stamp Set and has been cut with the Four Petal Flower PunchTo finish, I have added some silver sequins!  

Have a great Friday everyone!
Thanks
Stacey
xx

JULY ECLIPSE CARD CLASS - BIRTHDAY LOVE

in , , , , , , , , , by Stacey Marsh Independent UK Stampin' Up! Demonstrator, July 12, 2018
Hi all,

Following on from yesterday's post where I showed you one of the cards we put together in this month's Eclipse Card Class, here is the second one!

This technique, is probably the most popular when creating these cards, and so it was an obvious choice that we did this one!

The Thick Whisper White card base measures 5" x 7", and folded in the landscape orientation also.

I have added a base layer on the card front using Petal Pink Cardstock, measuring 4.75" x 6.75", and another layer of Basic Black cardstock measuring 4.5" x 6.5".

The top Whisper White layer measured 4.25" x 6.25".  I have stamped the rose image from the Healing Hugs Stamp Set in Powder Pink and the leaves from the same set in Pear PizzazzI have also added the texture stamp in Smoky Slate.

For the "Eclipse" part, I have die-cut the word LOVE out using the Large Letters Framelits Dies, and attached the stamped layer onto the Basic Black layer.

Before attaching the Basic Black layer onto the card front, I have tied some Black 0.5" Satin Ribbon around the top and secured with a mini glue dot.

Once attached to the card, I have then added Mini Stampin' Dimensionals to the letters and attached to the card front, making sure to leave a black shadow around each letter.

To finish, I have created a 3" x 1" banner using Powder Pink Cardstock and the Triple Banner Punch.  The "Birthday" sentiment comes from the Perennial Birthday Stamp Set.  Before stamping, I have stuck some washi-tape over the first word "Happy" and therefore the ink has only been added to the word that I want.   The banner has been attached to the card front using Mini Stampin' Dimensionals.  

To finish I have added 3 sets of 3 Metallic Sequins to add a little bit of shimmer when the card moves!


I really enjoyed creating these cards for my class attendess and it was such a fun class!

If you live locally in Kent, and would like to join one of my classes, check out the Local Events page of this blog for forthcoming dates.

Have a great day!
Stacey
xx

JULY ECLIPSE CARD CLASS - HAPPY BIRTHDAY

in , , , , , , , by Stacey Marsh Independent UK Stampin' Up! Demonstrator, July 11, 2018
Hi all,

Every month I host a card class workshop and each month the theme varies.  This month, after much request, we made Eclipse Cards using the Large Letters Framelits Dies.  These cards are all over the internet and social media sites at the moment and there are so many styles to choose from!

In the class, we put together 2 cards using different techniques to layer the letters and it was lots of fun!

The first card that I am going to show you uses a technique whereby you layer each individual letter with an additional letter stuck behind in a darker colour, thus giving the "eclipse" theme.  It also doubles up as a male card which I know are always well liked!


To start, this card measures 5" x 7" and has been designed in the landscape orientation.  Using Thick Whisper White Cardstock for the base, I have added a layer of DSP from the Twinkle Twinkle Designer Series Paper collection which measures 4.75" x 7" and attached to the card base.

The strip of Whisper White Cardstock layered next measures ** x 7" and before attaching to the card base, has been given a background using the diamond mask from the Pattern Party Decorative Masks that I have gone over with a Sponge Dauber and Night of Navy Ink. I have then added the wave which has been die-cut from the  Swirly Scribbles Thinlits Dies cut from Night of Navy cardstock.


For the letters, on a separate piece of Whisper White Cardstock I have stamped using Soft Sea Foam and Night of Navy Ink, a selection of stamps from the Swirly Bird Stamp SetI have then die-cut the letters outThe letters have been stuck to another set of letters that I have die-cut out from the same DSP that I has been used on the card front.  I have then added some Mini Stampin' Dimensionals and attached the letters to the card front.
For the banner at the bottom, I have used the triangle shaped banner in the Pick a Pennant Stamp Set, and stamped onto Whisper White using Soft Sea Foam I have used the letters in this stamp set to stamp Birthday in Black.  Although there are dies to coordinate with this stamp set, I have cut mine out using good old scissors!  I have used the Mini Stampin' Dimensionals again to attach the banner to the card front. 

I would love to read your comments on this one!

Thanks
Have a great day!

Stacey
xx


WOODEN TEXTURES DSP THANK YOU CARD

in , , , , , , by Stacey Marsh Independent UK Stampin' Up! Demonstrator, July 10, 2018
Hi all,

Tonight I am hosting my monthly card class and after much request, is all about the Eclipse Card!  Whilst I was creating the cards for this card, I had a good old play with the Large Letters Framelits Dies and came up with today's card for you!

It's a really quick and simple one to put together, and has NO STAMPING!  Some people I know love a project with little or no stamping so i'm sure this one will suit them marvellously!


This is a standard 4" x 5.75" card base that has been layered with a 2" strip of Basic Black Cardstock and 1.75" strip of Wood Textures Designer Series Papers attached along the bottom of the card so that there is a black border in the middle of the card.  I have cut the letters for THANK out of the grey star sheet from the Twinkle Twinkle Designer Series Papers, doodled around the edges of each letter with a 0.1m Journaling Pen  and attached straight onto the top section of the card.
"You" has been die-cut from the Celebrate You Thinlits Dies in Whisper White to finish.

Hope you have a great day!

Thanks for visiting as always.
Stacey
xx

JAR OF LOVE MEETS BALLOON CELEBRATION BIRTHDAY CARD

in , , , , , by Stacey Marsh Independent UK Stampin' Up! Demonstrator, July 09, 2018
/
Hi all,

I hope you all had a wonderful weekend.  Mine was full of fun with my girls, a good old crafting session and of course there was no escaping the football!  I won't pretend to be a football loving wife but it is nice to see England doing well for a change
and it makes the husband happy which is always a bonus!

Last week I posted a card using the Balloon Celebration Stamp Set, and for some reason since last -week I have had this card in my head!


Using the Jar of Love Stamp Set, instead of filling it with flowers, it's full of balloons!  Lovely colourful, balloons of happiness!

I have stamped the balloon tails onto the Whisper White card base, and also onto a separate piece of Whisper White.  I have stamped the Jar onto the same piece of Whisper White so that it looks like the tails are inside the jar.  I've then die-cut this our using the Everyday Jars Framelits Dies and added Black Metallic Thread to secure and add a little bit of texture.


The balloons have been stamped individually onto Whisper White cardstock, and cut out using the Balloon Bouquet Punch.  I have then attached them to the card using dimensional foam pads.

To finish, I have stamped Happy Birthday onto Basic Black cardstock using a Versamark Pad and heat embossed with Whisper White embossing powder.  They have then been added to the card using dimensionals to raise and finish!


The Jar of Love Stamp Set really is such a much loved and well used set of mine and I love using other stamp sets with it to fill these lovely jars with!

Have a great day!
Stacey
xx

-


HOPE YOUR DAY BLOOMS WITH HAPPINESS

in , , , , , , , by Stacey Marsh Independent UK Stampin' Up! Demonstrator, July 08, 2018
Hi all,

Now we all know Stampin' Up! colours are really high n pigment, but none as much as Pineapple Punch which is part of this years new in-colour collection.

I don't think you can help but smile when you see this colour, for me it is the colour of happy sunshine!

For today's card I have used it for the card base and added some the spotty DSP from the 2018 - 2020 In-colour DSP stack.
 For the main feature of this card, I have used the Varied Vases Stamp Set, along with the Vase Builder Punch.  To add colour to the flowers, I have used the Stampin' Write Markers and to finish, I have stamped the sentiment straight onto the DSP.

What do you think?

Thanks
Stacey
xx

HAVE A FABULOUS BIRTHDAY WITH HEARTFELT HUGS

in , , , , , , by Stacey Marsh Independent UK Stampin' Up! Demonstrator, July 07, 2018
Hi all,

For today's card I have finally had chance to play with the **NEW** Healing Hugs Stamp Set that really took my eye in the new catalogue.  I am a big flower fan, and I really like the large rose image in the set, and there are some great additional stamps that are just so versatile.

Although this set is great for "get well soon" style of cards, I have put together a Birthday card for today's card.

The card base is the lovely Gray Granite new colour for 2018, and I have stamped the rose using Petal Pink which is another new colour for 2018.  The great thing about the rose is that it is beautifully textured and it is just one stamp so there is no lining up needed.  I have been completely random in my stamping for the background.
 For the main feature of the card, I have stamped another rose in the same colour, cut out and attached over a circle of Gray Granite, and some folded Burlap Ribbon and Mini Silver Sequin Trim.  I have stamped the leaves in a returning favourite colour, Mossy Meadow, cut out and layered underneath.
To finish, I have used the Thoughtful Banners Stamp Set to create the sentiment tiles that I have added on dimensional foam pads. 

I am really excited to use this stamp set more, and there are so many colours that would really look stunning with the rose image!

Have a great day all
Stacey
xx


FANCY FOLD FRIDAY NO.8 - DOUBLE FOLDED CARD

in , , , , , , , , , by Stacey Marsh Independent UK Stampin' Up! Demonstrator, July 06, 2018
Hi all!

Friday is here at last, woohoo!  This week has been so busy and as much as I love the sunshine, this heat is just too much, especially for the little ones!  I hope you're managing to stay as cool as you can.

Fancy Fold day for me, and today's I have a double folded birthday card for you!

This is a standard 10.5cm x 15xm card base that I have folded in the normal way. 

I have then taken a 10cm x 28cm strip of cardstock, scored at 7cm and 14cm. 

I have attached the main piece to the card base, and folded into a Z shape.  

In between layers I have added extra cardstock and some neutrals DSP. 

 The trick with this type of card is to make sure that it stands up nicely, and for this I have secured the front piece and the card base with some tied Linen Thread.  This also adds some extra texture too which is never a bad thing!

To decorate, I have added a square, die-cut from the Stitched Shapes Framelits Dies, layered with some more cardstock and DSP and attached in a diamond shape onto the bottom fold.

The Butterfly comes from the Beautiful Day Stamp Set and has been coloured in with Stampin' Blends.  

The sentiment comes from the Thoughtful Banners Stamp Set and I have repeatedly stamped "Happy" and "Birthday" along a strip of cardstock.

I would love to know your thoughts on this one so please feel free to leave me a comment, or give me a like on Facebook!

Hope you have a great Friday!
Stacey
xx

BALLOON CELEBRATION MEETS THOUGHTFUL BANNERS

in , , , , , , , , by Stacey Marsh Independent UK Stampin' Up! Demonstrator, July 05, 2018
Hi all,

Some weeks, for me, really are really busy / borderline chaotic and this is one of those weeks. I did, however manage to grab a quick 45 minute crafting session and it definitely help alleviate some stress and, like a good yoga session, left me feeling a bit more balanced!

Today's card is one that put together in that short session and it may look like there's a lot going on but it is actually quite a simple one!


This card features a 3" x 4" piece of Blueberry Bushell DSP from the 2018 - 2020 in colour DSP stack.  I have mounted it onto the card base using Whisper White cardstock which makes the DSP "pop" a little bit more.

I have stamped a balloon from the Balloon Celebration Stamp Set and cut out using the Balloon Bouquet Punch. I have attached this to the card using a Dimensional foam pad and added some Whisper White Solid Baker's Twine for the balloon string.
The sentiment, and banner comes from the Thoughtful Banners Stamp Set and to finish I have added a few Metallic Sequins.
 I was really pleased with how this card came out and I definitely think I will be making more in different colours! 

What do you think? 

Have a great day
Stacey
xx

MERRY MERLOT & GRAY GRANITE TAKE 2!

in , , , , , by Stacey Marsh Independent UK Stampin' Up! Demonstrator, July 04, 2018
Hi all,

In yesterday's post I introduced two new colours that have been added to the Neutrals colour family, and here is another card using these lovely rich new colours!


Sticking with the Eastern Beauty Photopolymer Stamp Set and the Eastern Medallions Thinlits Dies, this card has been stamped with a selection of stamps in the two colours, and I have added a die-cut medallion to finish with a lovely sentiment "Let''s Be Friends Forever!"


What do you think? 

Have a great day!

Stacey
xx

INTRODUCING MERRY MERLOT AND GRAY GRANITE

in , , , , , by Stacey Marsh Independent UK Stampin' Up! Demonstrator, July 03, 2018
Hi all,

As some of you may know, Stampin' Up! has introduced 16 new colours into their existing colour collections and had a bit of a shuffle around. Colour collections are designed to be colour families of perfectly coordinated shades of colours and this, for some demonstrators, is the thing they love most about Stampin' Up! products. It is for me anyway...

Starting with the Neutrals collection, this was a good move by Stampin' Up! because they have added some actual colours into the collection and the brand new colours are called Merry Merlot (a deep red wine colour) and Gray Granite (a medium tone if Gray). They have also returned Mossy Meadow (green) and moved Night of Navy into the collection.

Today's card showcases Merry Merlot and Gray Granite.....

The cardbase has been cut from a piece of A4 Merry Merlot Cardstock, and layered with Whisper White.  I have die-cut a piece of Gray Granite cardstock using the Eastern Medallions Thinlits Dies and attached to the Whisper White layer.


"Happy Birthday" is from the Perennial Birthday Stamp Set, and has been stamped onto Whisper White cardstock using a Merry Merlot Classic Stampin' Pad and layered over a strip of Merry Merlot cardstock.  The element on the left hand side of the sentiment has been cut from a piece of Gray Granite cardstock, die-cut using the same die that has been used for the backrgound and then cut using the 2" Circle Punch.  I have added the Merry Merlot stamped shape using another die from the Eastern Medallions Thinlits Dies and the co-ordinating stamp from the Eastern Beauty Photopolymer Stamp Set


Thanks for reading, I hope you have a great day!
Stacey
xx


HAPPY BIRTHDAY LEAVES AND BURLAP

in , , , , , , , , , by Stacey Marsh Independent UK Stampin' Up! Demonstrator, July 02, 2018
Hi all,

A new week here and I hope you all enjoyed a lovely weekend. As usual it was super busy here with a school summer Fete, a dance show, the world cup, a trip to the seaside and an afternoon spent kayaking!

Sadly no crafting time but I have a few projects to share with you this week that I made "earlier".

Today's card is a simple "Happy Birthday" card. This one is all hand stamped by me too. The leaves, believe it are not, is not printed DSP but a leaf stamp inked with an Old Olive Stampin' Pad and stamped at random using 1st, 2nd and 3rd generation of ink. This is a great technique for creating depth in your Stamping without using different colours. I really think the Burlap Ribbon is the perfect addition here to make it feel a bit rustic and the colour goes really nicely.


The sentiment comes from the Better Together Stamp Set which has been attempted onto Whisper White cardstock and cut out with the Starburst PunchI. a
I have used the 2.5" Circle Punch to cut out the brown circle which had been leaguers behind it.  I have die cut some leaves in Old Olive and Garden Green cardstock and Velum which have been layered behind the sentiment.


To finish I have added some Rhinestone Jewels.

What do you think?

Have a great day
Stacey
xx

**JOINING OFFER ALERT**

by Stacey Marsh Independent UK Stampin' Up! Demonstrator, July 01, 2018
Hi all,

Wow where is this year disappearing to?!  I can't believe it is the 1st July today!

Stampin' Up! like to keep demonstrators on their toes by introducing new offers and exciting reasons for you to get involved with and today I bring you an amazing JOINING OFFER that is available throughout the whole of July!

Purchase £130 worth of product for £99, and choose a colour collection of ink pads for FREE!  Each collection is £63 to buy normally so that is £193 worth of product for just £99!!  How  amazingly fantabulous is that?!!  Click join now on my blog or if you have any questions, I am happy to answer them for you!
Have a great Sunday everyone!
Stacey
xx


CLEARANCE RACK

© STACEY MARSH · THEME BY WATDESIGNEXPRESS