HAPPIEST OF BIRTHDAYS TO YOU WITH PICTURE PERFECT BIRTHDAY

in , , , , , by Stacey Marsh Independent UK Stampin' Up! ® Demonstrator, July 31, 2018
Hi all,

For those of you that follow me on Facebook I posted yesterday about now that it is the summer holidays, although that means more family time, no alarms and less rushing about, it also means less time to craft. 

Saying that, I do have a card class planned on the 21st August, a birthday card club that I am part of to create lots of cards for, a farmers market to prep cards for and there is a brand new catalogue coming so I must plan some quality crafting time!

Today's card is a quick one that I put together last night because I needed to craft and didn't have a great amount of time. 


I have used the Picture Perfect Stamp Set for everything on this card. It's a great set and I really like the font for the sentiments!

I have chosen to use So Saffron for the colour of this card along with some Whisper White and Basic Black.  

The candles are individual stamps that I have lined up in a row and stamped.  The flames have been added after and I have stamped the sentiment over the top.  These have been die-cut using the Layering Squares Thinlits Dies to finish. 


Hi all,

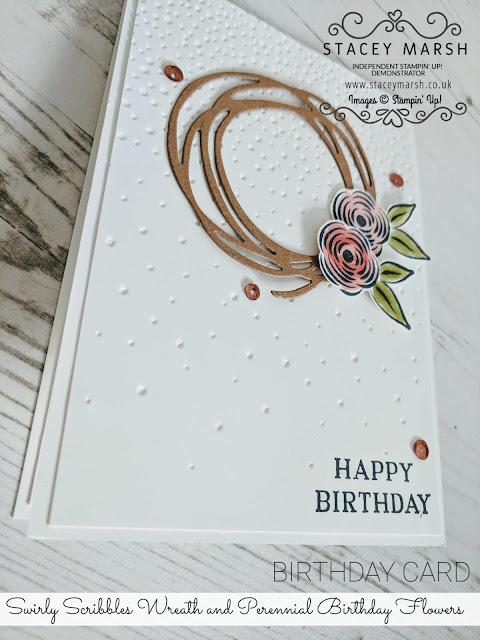
I recently re-discovered the Swirly Bird Stamp Set and Swirly Scribbles Thinlits Dies that go with it. It is such a versatile set of products and the combinations are endless.  I'm sure with a quick search of the stamp set or dies you will see an array of gorgeous cards and projects!

Today's card features one the dies that I have used to create a wreath design.  This is quite popular for christmas cards too which i'm sure you will start to see here very soon!

The base of this card has been put together using Thick Whisper White Cardstock.  At a recent card class, one of my ladies remarked how strong this card for card bases, hurrah!


The card front measures 10.5cm x 14.8cm, so you can get two card bases out of 1 A4 sheet of cardstock.  To create the background, I have cut a piece of regular thickness Whisper White Cardstock measuring 10cm x 14.3cm, and run it through the Softly Falling Embossing Folder.  Usually you see this used with the raised dots showing, however this time I have chosen to use the de-bossed side.  The options with embossing folders are endless too!


For the wreath, I have used the die to cut out some Kraft card, and attached this to the card front using two or three Mini Glue Dots.  

To make the flowers, I have stamped two flower images from the Perennial Birthday Stamp Set onto Whisper White Cardstock using a Tuxedo Black Memento Ink Pad and coloured in using Stampin' Blends Pens.  Both have been cut out with scissors and added to the card seperately, 1 with Stampin' Dimensionals and the other with a Mini Glue Dots.to vary the depth of the card design. 

To finish, I have added the "Happy Birthday" sentiment from the Perennial Birthday Stamp Set at the bottom and added a few Metallic Sequins for a bit of shimmer!
What do you think?


Have a great day!
Stacey
xx

COLOURING WITH LOVE WHAT YOU DO

in , , , , , , , , by Stacey Marsh Independent UK Stampin' Up! ® Demonstrator, July 18, 2018
Hi all,

I hope you all had a wonderful weekend.
This is the last week of the school year for me so it's a bit crazy here with finishing up work, getting the girls all sorted for the end of term and trying to remain calm!

Today I am sharing with you a Thank You Card that I have put together to share with a few people I wish to thank at the end of term.

For this card, I stamped a whole sheet of A4 Whisper White cardstock with the main flower image from the **NEW** Love What You Do Stamp Set followed by the dotty flower image, leaves and finally the dots from the Perennial Birthday Stamp Set. I coloured the images in roughly using Stampin' Blends and then cut up to form the background for these cards.


I have stamped the flowers again on a seperate piece of A4 Whisper White cardstock , coloured again and then cut out.


For the sentiment, I have stamped "Thank You" and cut out using the Tailored Tag Punch. I have cut out a piece of Basic Black cardstock using the Starburst Punch and layered together using Stampin' Dimensionals and added the cut out flower between. To finish, I have added a few Metallic Sequins.

Because I stamped a whole sheet of A4, I was able to bulk create 4 cards with just two additional sheets of Thick Whisper White Cardstock to create the card bases.

I hope you have a great day!
Stacey
xx

FANCY FOLD FRIDAY No.9 - SMALL TOTE BAG

in , , , , , , , by Stacey Marsh Independent UK Stampin' Up! ® Demonstrator, July 13, 2018
Hi all,

Where has this week disappeared to, it feels like just yesterday it was last week's Fancy Fold Friday!

It was my monthly card class on Tuesday, and this month was all about the Eclipse Card!  Whenever anyone comes to my class, I always like to include a little something extra just to say thank you for coming and to show my appreciation.

This month, I put together a lovely little tote bag using some DSP from the Twinkle Twinkle collection that we used to make one of the cards.  I filled these with some delicious sweets for my ladies to enjoy whilst crafting the evening away!


These bags are made from sheets of DSP folded round a small tray that has been made up using cardstock and are so simple to put together!  The handles are just folded over and glued. 

 To decorate, believe it or not I have created the tag using the Balloon Bouquet Punch!  I have stamped the sentiment from the Treat Time Stamp Set.  The whole for the thread has been cut using the 1/8" Circle Punch and I have used Linen Threat to secure around the handle.  The flower comes from the Pop of Petals Stamp Set and has been cut with the Four Petal Flower PunchTo finish, I have added some silver sequins!  

Have a great Friday everyone!
Thanks
Stacey
xx

CONTACT ME

Name

Email *

Message *

CLEARANCE RACK

FOLLOW ME ON INSTAGRAM

© STACEY MARSH · THEME BY WATDESIGNEXPRESS